But it doesn’t have to be if its practiced with something fun like riddles.
Honestly, when I first started out teaching… division always felt like a confusing jumble of numbers because didn’t have their facts memorized.
No matter how much you try to make your kids practice division problems unless they have a solid grasp of math facts they won’t be able to work on those complex problems.
It’s like not knowing how to drive but trying to drive anyway.
If that’s the case, then what we should be focusing on is helping them get their basic math facts straight.
By fifth grade, students should be proficient in basic math facts but if that’s not the case, there’s a problem.
To be honest, there can be many reasons for this problem.
Reasons like
a lack of understanding,
memorization feeling like a draining task,
table overload,
multiplication confusion,
and more can all contribute to elementary kids not having a good grip on facts.
Are you interested in knowing how I make division practice fun and engaging for my kiddos?
Without making it seem like they are practicing… It’s by using riddles!
Riddles are a perfect teaching tool to help students develop division and problem-solving skills during back-to-school time or throughout the whole year.
Why Division Practice Is Important
Practicing division problems is crucial for a kid’s basic math learning and understanding.
It’s like a foundational math skill that helps kids make sense of math.
When children practice division, they learn how to break things into equal parts and understand the relationship between multiplication and division.
This reinforces their number sense, basically how they see and work with numbers in daily life.
It also helps them solve real-world problems.
Let’s say, they’re cutting a pizza into slices or figuring out how many cookies each friend gets, knowing how to divide makes it easier for them.
The most important thing is, it opens doors for advanced topics like fractions, ratios, and algebra later on grades.
Ina nutshell, division helps kids:
Increase their problem-solving abilities
Build confidence in handling day to day calculations
Improve their understanding of the world around them
Now that you know how important it is for our kids to practice division problems. Let’s talk solutions.
The best way I am able to get my students working on division practice is by using division riddles.
They keep kids focused on the task at hand and builds perseverance.
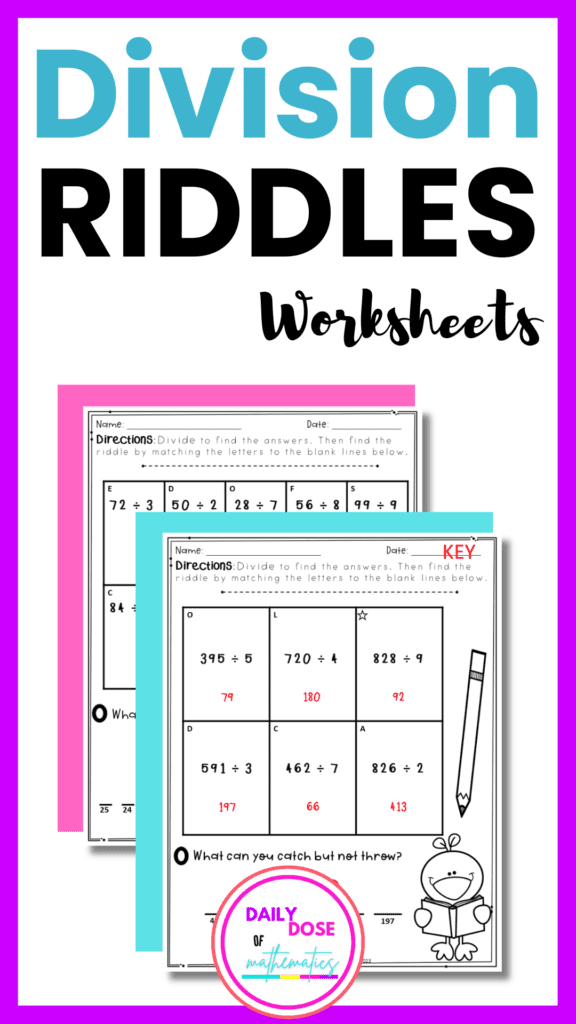
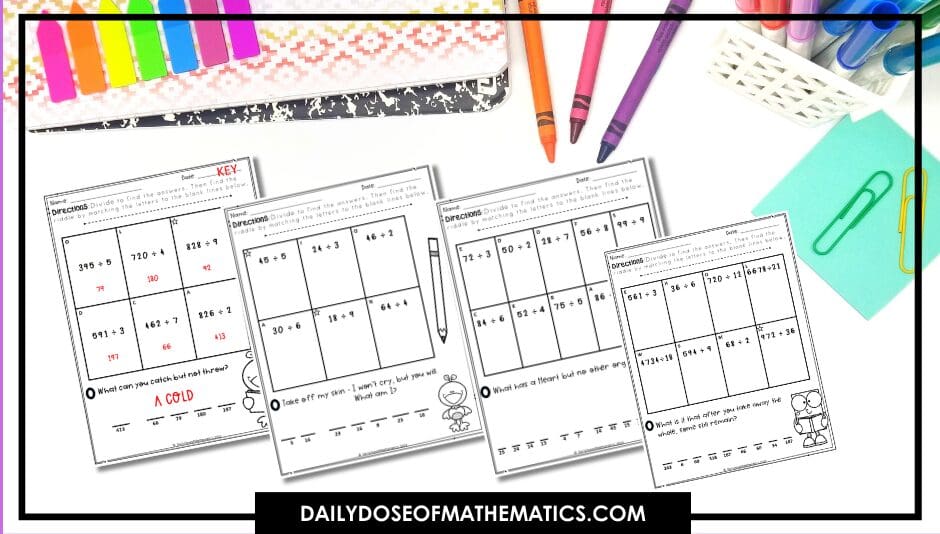
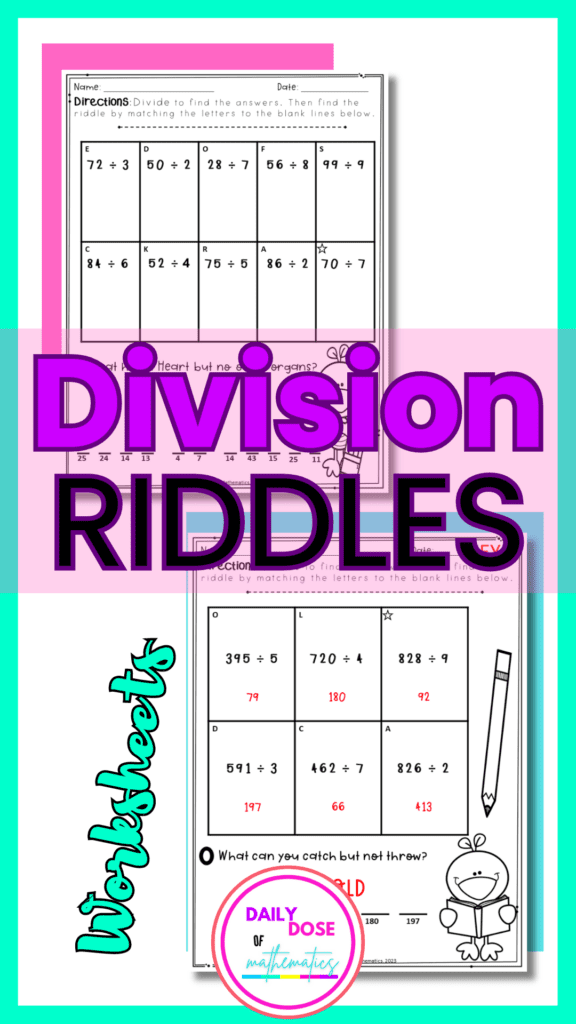
How Division Riddles Works:
You hand out one of the division riddles to your kids.
The week before Thanksgiving is pure chaos in most middle school classrooms.
Students are hyped about the holidays, focus levels drop, and teachers (yes, you!) are juggling lesson plans, grading, and trying to keep the class calm.
That’s where seasonal resources come in.
Thanksgiving GCF and LCM worksheets with answers aren’t just a cute idea they’re a strategic teaching tool.
They combine review and engagement so your students practice key math concepts without tuning out.
In this post, we’ll walk through what GCF and LCM are (with examples), why themed math activities work so well, and where you can grab high-quality Thanksgiving worksheets that save you time. But before that let’s first try to answer:
What Is GCF and LCM (with Example)?
Before diving into Thanksgiving math fun for 6th grade math, let’s make sure we’re all on the same page, especially if you’re prepping sub plans or review material for your students.
Thanksgiving GCF and LCM Worksheets and Activities Grade 6 PDF 1
GCF stands for Greatest Common Factor. It’s the largest number that divides evenly into two or more numbers.
LCM stands for Least Common Multiple. It’s the smallest multiple that two or more numbers share.
For example:
Let’s find the GCF and LCM of 27 and 45.
Step 1: List the factors.
Factors of 27 → 1, 3, 9, 27
Factors of 45 → 1, 3, 5, 9, 15, 45
and here GCF = 9, because it’s the largest number both have in common.
Step 2: List the multiples.
Multiples of 27 → 27, 54, 81, 108, 135, …
Multiples of 45 → 45, 90, 135, …
Therefore, LCM = 135, because it’s the smallest number both share.
Struggling to teach the area of composite figures in a way your students actually get?
Ever wondered that every time you feel like thinking about how to get started or how even to think about introducing the topic to your kids, frustration kicks in!
Believe it or not, we all have been there during our first few years of teaching.
And you’re not alone… If your kids are zoning out the second you say “area” keep reading, this post breaks it down with easy, engaging ideas that make sense (and work for all levels).
Explore the Area of complex figures in an exciting way
Let’s be real right now teaching math isn’t what it used to be. Today’s kids are growing up with TikTok-level attention spans and infinite entertainment options at their fingertips.
That means if your area of complex shapes lessons are not engaging and exciting enough, you’ve already lost half the battle.
Here’s the good news, you don’t need flashy tech or hours of prep work just to make the area of composite figures click for your students. You just need the right strategy.
So how do you teach this topic in a way that’s fun, clear, and actually sticks?
The answer: make it visual, hands-on, and connected to real life, yup, that’s right this way your students aren’t just memorizing formulas, they’re solving problems like mini math detectives on a mission hunt.
Now the question is where do you begin?
Start with the Basics:
Like I said, it all starts with basics.
And to be honest, there is no other answer to this problem other than nailing the basics!
Here is the hard truth… if kids find the lesson interesting, they are more likely to be engaged and motivated to learn about the problem, think about it, practice it, and ultimately feel a sense of confidence in their skills.
Here are the steps to help kids see math everywhere in their life.
Step 1: Help Students See Math Everywhere (Real-Life Hook)
One of the most effective ways to introduce composite figures is by showing students where these shapes exist in their world.
What it means is to check for there: Activate prior knowledge. Ask your students:
What basic shapes do you already know?
Can you think of any objects that are made up of more than one shape?
Then guide them to see that a playground, a building (maybe school) floor plan, or even a weird-shaped pizza is made of multiple simple shapes.
🟩 + 🟥 + 🟦 = Composite figure.
Your goal here is to help them realize that composite shapes are just familiar shapes combined, nothing fancy.
Step 2: Revisit the Basics with Hands-On Practice
Before diving into composite figures, make sure your students are rock solid on calculating the area of:
Squares
Rectangles
Triangles
Here is a Pro Tip: Use graph paper and have them COUNT squares to confirm what the formulas actually do. This helps your visual and tactile learners “see” the math in action.
Step 3: Decompose a Composite Figure (using engaging activities)
Once the basics are solid, it’s time for the real fun, breaking down a complex shape into smaller, manageable parts.
Here is an activity you can try in your class:
Show them a real-life layout — like a house blueprint or the shape of a playground.
Ask them to identify the basic shapes they see.
Have them outline or color-code each individual shape inside the figure.
Guide them through finding the area of each part — and then adding it all together.
Finding the Area of Composite Figures or Complex Figures (Color by Number)
Since kids have already mastered how to calculate the area of regular shapes, it’s time to introduce them to composite figures.
You can use any composite shape, like a park or a house layout, and ask what they see.
Tell them to imagine the shape as a whole building made by several small ones and treat every small shape like a rectangle, square, or triangle as a room inside the building.
Let them think about this concept for a while, and then decompose the shape into its parts and find the area of the individual basic shape.
Finding Area of Complex Figures Piece by Piece
Next, it’s time to decompose composite figures like literally breaking the big shape into smaller, familiar parts.
For better understanding, it’s good to introduce a composite figure with 2 or 3 squares or rectangles and then move on to the more complex figures.
The next step is to ask your kids how many squares or rectangles they see inside their big figures.
Have them trace or outline each individual shape in a different color and then calculate the area of each smaller part one shape at a time.
Pro Tip: Write the area inside each shape as they go to help them see their progress. Next step is to calculate the areas of these individual shapes.
Since your students by now already know how to calculate the area of regular figures, it would not be a daunting task. Lastly, ask them to add all of them together to get the total area.
Finding the Area of Complex Figures (Trending and Most Popular)
Now comes the fun part: tell your kids that we are calculating the area of the whole building, not just the single rooms inside.
They also know how to calculate it by adding the areas of each smaller shape. Basically, by summing up, kids will be able to tell what the area of the complex figure is.
Want some fun digital and printable activities to help you with this lesson?
If integers make your students’ eyes roll, you’re not alone. Integers and their opposites, especially negative numbers, can feel abstract and confusing.
This is where students start mixing up subtraction with “opposites” or struggle to see how positive and negative numbers relate.
The good news? With the right visuals and activities, integers don’t have to be this overwhelming.
In fact, you can make them click for students in a way that actually sticks.
1. Start with Real-Life Examples
The fastest way to make integers feel less intimidating in grade 6 is to ground them in everyday life. A few examples that always land with my students are:
Temperature: Show how 10° above zero and 10° below zero represent opposites.
Elevation: Compare a mountain peak to a cave below sea level.
Money: Talk about having $20 in your bank account versus owing $20.
The goal here is to make the concept more relatable using the example, so the students can connect faster.
You can even ask them to share their own examples, maybe like sports scores or video game points going into the negative.
2. Use a Number Line for Integers and their Opposites
A number line is the foundation for understanding integers. You should first focus on making sure students understand integers using a number line.
When students see numbers laid out visually, they notice the symmetry: every positive number has a negative counterpart that is at the same distance from zero.
Highlight how +5 and -5 “mirror” each other.
Reinforce the idea that zero is the center, it’s neutral ground, so its negative is also 0.
Use visuals (a giant number line taped on the floor works wonders).
This method makes integers less of an abstract idea and more of a pattern they can see and interact with.
3. Introduce Integer Opposites as “Math Twins”
Kids love simple, fun language. Try describing opposites as math twins:
+3 and -3 are twinssame distance, different sides of zero.
Use hand motions: one hand moves right, the other moves left.
Have students physically “be the numbers” by standing on either side of a taped zero line in the classroom.
This builds a physical connection, visualizes the concept and gets them out of their seats (which is always a win).
4. Make it Interactive (Coloring + Games)
Here is the thing: students learn best when they do. Practicing is the key to success in math. Bring integers to life with:
Coloring activities where each answer reveals a picture.
Matching games: pair positives with their opposites.
Scavenger hunts: hide cards around the room and let students find “integer pairs.”
Even after a lot of practice and explaining with strong visuals, some misconceptions pop up again and again: Here is a list of a few that I encounter again anad again:
Mixing up subtraction with opposites: For this, clarify that “the opposite of +4 is -4,” but “subtracting 4” is a different operation.
Thinking zero has an opposite: Reinforce that zero is its own buddy it has no opposite.
Believing negatives are always “smaller”: Explain that while -10 is less than -2, the distance from zero tells us size in terms of opposites.
Take a few minutes to address these early, and you’ll prevent bigger struggles in later concepts.
6. Wrap It Up
Teaching integers doesn’t have to be a headache for you or your students.
By combining real-life examples, number lines, and interactive activities, you’ll help students finally see opposites in a way that sticks.
And if you’d like even more freebies for your math classroom, join my email list, where I share grab-and-go resources like fraction operations for busy math teachers like you.
Looking for a 3 digit addition problem worksheets to practice 3 digit addition or subtraction with your students? Look no more because I got you covered.
Helping students work on word problems is a daunting task.
Especially if you are trying to encourage them to think independently on math problems and solve them on their own.
That is why I have created these fun and engaging 3 digit word problem worksheets that are free for you to grab and teach now.
Print the problems you want your students to work on and hand them to your class. Students can solve the word problems independently, or you can help them complete the task.
What I like to do in my class is put them in pairs. This way, even if one of the kids gets stuck, they can help each other out and figure out the solution.
Here are a few benefits of using 3-digit word problems worksheets in your classroom
Increase in reasoning and problem solving skills
More understanding of the topic by using comprehension skills
Able to break down more significant concepts into small problems
Are you and your kids ready for some festive fun St. Patrick’s Day spirit in your classroom?
Are you ready to say goodbye to boring activities and see your kids excited to learn math this season?
Then follow along with me for some super fun things you can try in your classroom this season.
By using these St. Patrick’s Day themed Solve The Room Activity you will be able to finally bring some Irish charm into your classroom.
But…
First things first why would you actually need to use this activity?
For me personally, this activity is something I use in my 5th grade math classroom whenever I feel like my kids need a break from their usual math learning and it’s time for some movement going to keep their learning juice flow.
So if it feels like you are facing the same problem, then here are my top 3 reasons why you should use Saint Patrick’s Day themed Scoot activities in your math class:
1. Encourages Movement and Interaction:
The ‘Solve The Room‘ aspect of this activity adds a physical aspect to learning.
Kids aren’t just sitting at their desks and practicing, instead, they’re moving around the classroom.
All right, so we’re diving into the exciting and full of fun world of… 3 digit addition. As a math teacher myself, I know what you might be thinking! I know, I know. ‘three digit addition’ and ‘exciting’ are two phrases that you probably never expected to see in the same sentence. Yet, here we are!
But for a moment, I want you to picture this: your kids, completely absorbed, their minds buzzing away as they add numbers. No more expressionless eyes, no more “Do I have to?” Instead, they’re eager. They’re engaged. They’re learning. Sounds like a far-off dream? Well, it isn’t, and thanks to the gamified math lessons, this could be the reality of your classroom.
I remember when I was a kid, and math felt like a tedious chore. But honestly, I do not want that for my kids in the classroom, so it’s time that we as math teachers, put those days behind us.
Let’s make learning two and three digit addition and subtraction worksheets a game — literally. How? Here is a step by step month-long journey to transform 3 digit addition from ‘Ugh, not again!’ to ‘Can we do more?’ in your classroom.
Week 1: Nailing the basics of the concept of 3 digit addition
Ever tried to build a castle on sand? It’s a shaky business, right? The same goes for 3 digit addition with elementary students. If you’re shaky on the basics, teachers! Well, you’re setting your class up for a castle full of confusion. Let’s clear the air on this. Shall we?
Now, for your kids to understand 3 digit addition with and without regrouping, you first need to make them recognize the importance of place values. They should’ve got hundreds, tens, and ones down. To clarify this concept to your kiddos, you can tell them to picture hundreds, tens, and ones as three shelves in a bookcase, each with a specific spot for its ‘book’.
But the thing to remember here is that it’s essential for the numbers to go in their right place. Misplace the numbers, and you’ve got chaos!
Then comes the tricky bit: carrying over. A common hiccup, often as mystifying as a magician’s trick. But it does not have to be that. You can simplify it further for them. So, if your ‘ones’ total more than 9, you ‘carry over’ the extra to the ‘tens’ shelf. Same rule for the ‘tens’ to the ‘hundreds’. It’s like when you’re packing a suitcase, and it overflows – you need another bag!
Now, what about gamification in math? Think of it like turning broccoli into a superhero. Kids love games, right? So why not use that love to turn learning 3 digit addition and subtraction with and without regrouping into a thrilling adventure?
Gamification takes the chore out of learning, and makes it interactive, and here’s the important part: it leverages our innate love for rewards. There are several platforms and tools for gamification, with different colors suited to different needs.
Week 2: Preparing the Gamified 3 Digit Addition with and without regrouping Lessons
So you’re ready to transform your class into a gaming field. But which platform to choose? It can get overwhelming pretty quickly if you do not know exactly what you are looking for. More like being in a candy shop with infinite choices.
But what I can tell you from personal experience is that features, user feedback, and, most importantly, compatibility with your class size, age group, and tech comfort is all that matter.
Selecting a platform is just the beginning. Next, you’ve got to figure out a way to add your triple digit addition and subtraction curriculum to this platform. Initially, it might feel like you are doing a puzzle. You need to break down the curriculum into daily and weekly objectives, making sure each game fits seamlessly into the learning process.
Now the most important part here is to remember, that variety is the spice of your classroom! Mixing up games and keeping the interest alive is what you should aim for. Imagine being served the same dish every day. Boring, right? The same goes for your class. So spice it up with a variety of games.
Week 3: Rolling Out the Gamified Lessons
Now comes the big reveal. Introducing the new approach to students can be a dance as delicate as a ballet. The aim? To make sure they understand how the platform works, how it’ll be integrated into their learning, and – this is key – why it’s gonna be super fun.
As the lessons roll out, be ready to wear the hat of an eagle-eyed observer. Tracking progress, and providing feedback, it’s all part of the game. It’s like being a coach on the sidelines, guiding and cheering on the players.
Wanna know what I use to add a gamification touch to my 3 single digit addition worksheets in class,check this out on TPT!
Week 4: Evaluating Progress and Getting Ready for the Quiz
After the lesson is been done and you feel like your students get the concept it’s time for the big day! I mean Quiz day! Although students dread to go through a quiz, not in our gamified class! Here, quizzes are designed to mimic the game-based problems, making them less of a scary monster and more of a friendly challenge.
You can offer your students study aids and revision sessions to help them clarify any gaps in their learning. A little extra help won’t hurt anyone. Alongside this, you can gather progress reports for each student. Here you’re not just looking at who’s soaring and who’s stumbling but also pinpointing the areas where students commonly trip up.
And now, the finale of week four: prepping for the quiz. Make sure to review the main concepts, but more than that, ensure the students have a clear concept of the topic and what lies ahead.
You can even use these riddle Worksheets to evaluate your student’s early progress.
Quiz Day: The Ticket to 3 digit addition with ans without regrouping worksheets Stardom
Now comes the day the students have been working towards. The quiz. It’s the chance to put all that they’ve learned to the test.
The quiz results aren’t just numbers but celebrations of success and stepping stones for further learning. Each correct answer calls for a small classroom celebration, and each misstep is an opportunity to learn and improve. Remember, every cloud has a silver lining.
So there you have it. But remember it’s not just about the numbers, but about making learning an experience. It’s about taking those dread-filled, yawn-inducing lessons and turning them into a journey of exploration, excitement, and fun.
So, if you want to break the chains of traditional teaching and think outside the box, it’s time that you implement these strategies into your classroom and play. Gamified lessons aren’t just an educational trend. They’re the key to exposing engagement, sparking curiosity, and making your students not just learn but love the process.
Especially in a world where children are often glued to screens and gadgets, gamifying math lessons can serve as a link in our classrooms that merges education with entertainment in the most effective manner. So in order to take the ‘boredom” out of traditional math lessons and transform it into an exciting experience that students can enjoy while learning new math skills at the same time it’s more like a necessity now.
As teachers, it’s our duty to make sure that every child in our class experiences the thrill of learning. With the right tools and approach, even the most seemingly mundane topics like 3 digit addition can become adventure journeys for exploration. By continuously experimenting with new techniques and, most importantly, making math fun we can make math exciting for our young generation. After all, isn’t that what education should be – an exciting journey of discovery for our students?
Remember, the journey of a thousand miles begins with a single step. You’ve got this. Just imagine, a classroom humming with excitement, picture the pride on your students’ faces when they nail a complex 3-digit addition problem, not because they had to, but because they wanted to.
Conclusion:
You have the power to turn ‘boring math Class‘ into ‘bring it on!. To replace sighs of boredom with cheers of excitement. To transform ‘I don’t get it’ into ‘I did it!’.
Since the methods of teaching in education are always evolving, it’s crucial that we continually seek methods that not only enhance the learning experience but also ignite a passion within our students.
Gamified math 3 digit addition lessons can bridge the gap between conventional teaching and the digital age. By transforming the seemingly mundane task of 3-digit addition practice into an engaging journey, we aren’t just teaching numbers – we’re nurturing a love for learning.
The unexpected joy and enthusiasm that arise from such methods prove that with the right tools and mindset, even the most traditional subjects can be refreshed and revitalized. Let’s continue to innovate and inspire, turning challenges into opportunities and learners into lifelong enthusiasts. After all, when education is fun, the sky’s the limit.